Solar Panels
- Renogy 100 Watts 12 Volts Monocrystalline Solar Panel ($150 x 2)
- MC4 Male/ Female Solar Panel Cable Connectors ($7.50)
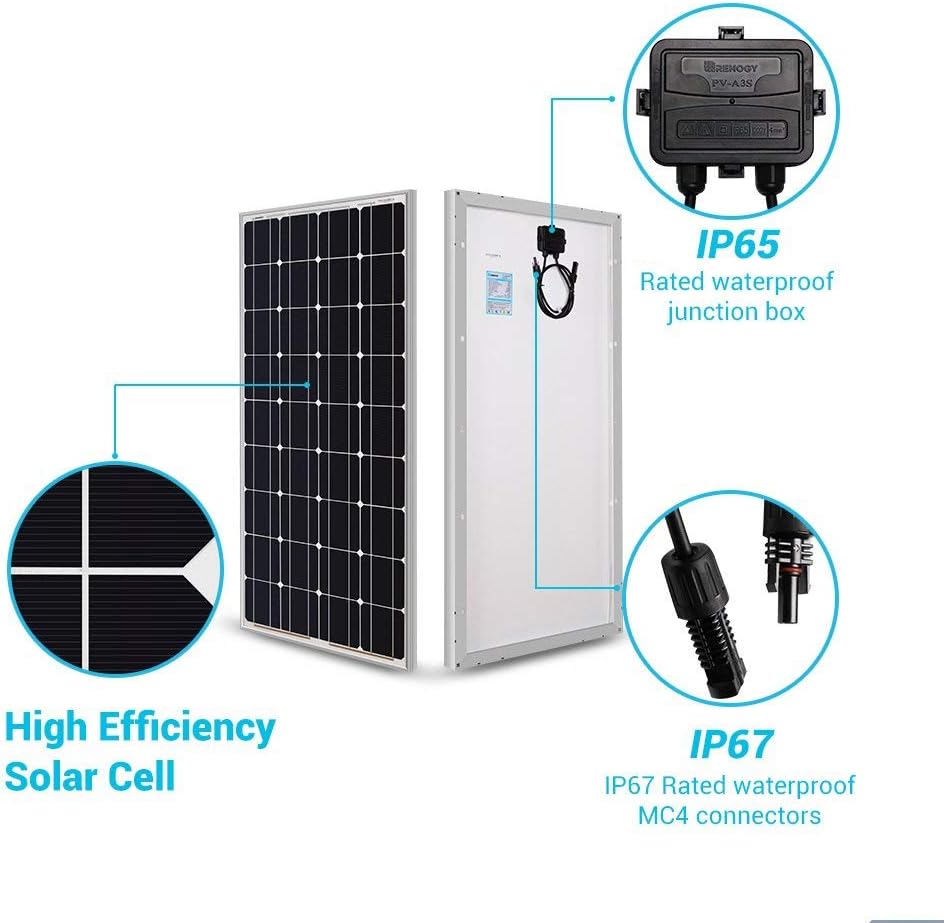
I decided to get two 100W Renogy panels. 200W is not a lot, but it was what fit comfortably on my roof (at least while retaining the ability to open the “skylight”/sunroof). These particular panels were very popular with the vandwelling community and sold for $150/each with free shipping on Amazon. They were “monocrystalline” panels, which meant they would have better lowlight performance than “polycrystalline” panels. I also got some MC4 connectors to extend the panel wires to the inside of the van, where they would connect to the power shelf.
Batteries
- Calb 60Ah 3.2V 2C LiFePO4 Prismatic Cells (#CA60FI) x 4 ($410 total)
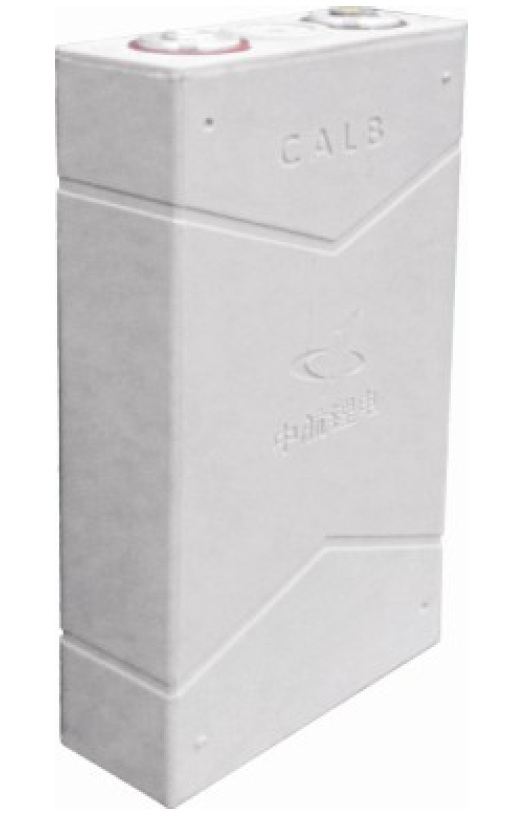
Having researched batteries all summer at a UAV drone internship, I knew that I wanted my system to use LiFePO4 batteries. These were relatively new at the time and resources for how to integrate them into a van build rather limited. Most people still used some flavor of standard lead acid chemistry (SLA, AGM, etc) car batteries.
Some drawbacks of lead acid:
- Heavy and bulky
- Designed to be briefly discharged when starting a car, and immediately topped off again by an alternator
- Lifespan quickly decreases if you discharge them to any meaningful degree
- Even variants (“deep cycle”/“marine”/etc) tolerant of discharging to 50-90% require you to essentially double your capacity (since the last 50% is still a no-touchy zone)
- Voltage sags (drops) under load
- Slow to charge
- Potentially leaky (unless they are the sealed kind)
- Often needed to be oriented a specific direction due to their watery innards
- Can offgas toxic fumes (fine in an engine bay, not great in your living space - especially for anosmics…)
- ~33% self-discharge per month
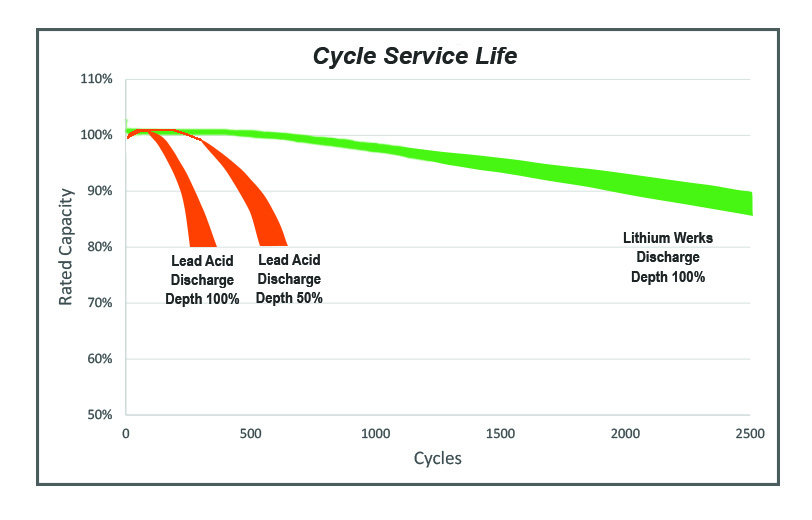
- ~200-500 cycle lifespan
Some benefits of LiFePOs:
- Less explosively temperamental/flammable than Li-Ion
- More suited to repeated deep discharging than lead acid (usable down to ~10% or so)
- Far more compact and lightweight
- Significantly faster at charging and discharging
- Relatively stable voltage across charge levels/under load
- Less liquid-y/leaky than lead acid
- No toxic offgassing
- ~3% self-discharge per month
- ~2000 cycle lifespan
LiFePOs didn’t just last longer, you also got far more capacity for the same weight. A LiFePO pack might weigh 1/3 of a lead acid equivalent while also offering you twice the amount of usable electricity. In the long run, all this meant that LiFePOs were much more affordable. The main drawback of LiFePOs was that they weren’t as commonly available (you couldn’t just get a new one at Wal-mart), had a higher upfront cost, and were far less well documented. They also didn’t like to charge below freezing, but that was fine. I wasn’t going to be in an exceptionally cold area anyway and they could go up in the warmest/highest part of the van. Ultimately, the sizing of my battery pack was largely determined by my budget. I went with a 60AH size because it was the biggest I could afford in both electrical and physical dimensions.
Interesting trivia: as of 2021, Tesla began using LiFePO batteries in its electric cars.
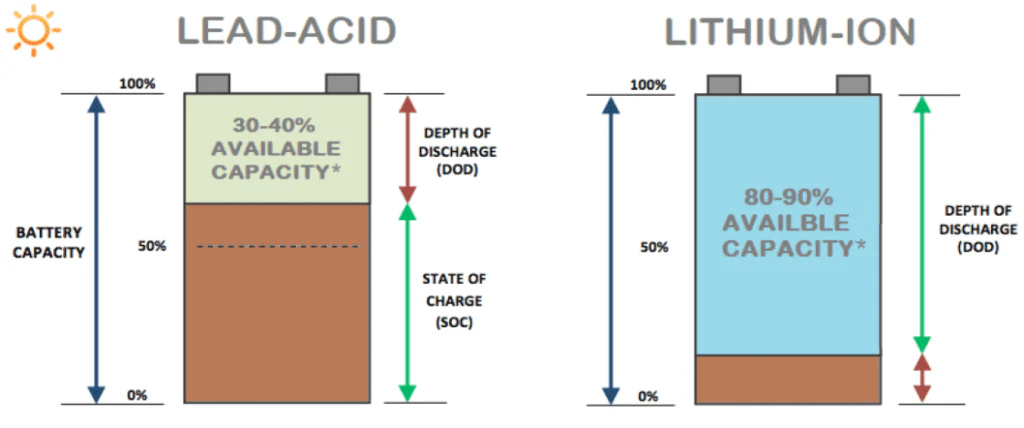

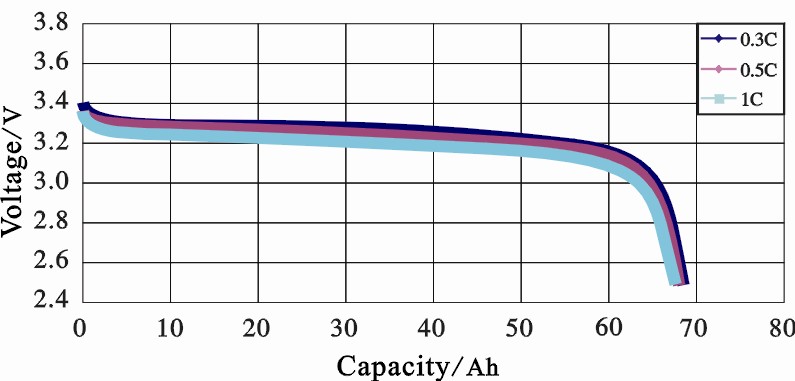
One benefit of lead acid is that measuring state of charge is very simple. The voltage decreases nearly linearly as the charge depletes. Determining the state of charge of a LiFePO cell is more tricky. LiFePOs’ discharge curve has roughly the same voltage from 10-90% of their capacity. One hazard this presents is that if you have a 20% full cell and an 80% cell that you joined together to form a battery pack, when you charged the pack up to full, your 20%er would be undercharged even as the 80%er would be overcharged. This can negatively effect both power delivery and battery health.
A BMS (battery management system) can resolve some of these issues by monitoring each cell and shutting off current to individual cells as they reach capacity while charging. At the time, however, there was a lot of debate on which ones (if any) were good, the bad ones tended to murder your cells when they malfunctioned, and adding alternator charging into the equation only further confused matters. Given the high expense and uncertain results I opted not to include a BMS. With only 4 cells, my setup was a lot smaller than an electric car, so I would simply check up on things now and then with a multimeter.
I’d read that one way of (at least partially) mitigating the “different charge level” issue was to perform a procedure called “bottom balancing.” To bottom balance your cells, you would carefully drain each cell down past the 10% threshold to the point where the voltage starts to be a meaningful indicator again and then charge them evenly from there.
Over the years, I would check the voltages on my batteries from time to time to see if things were drifting out of calibration. I also set my charging and discharging cutoffs in my charge controller very conservatively, which may have helped some. Skipping the BMS was a bit #YOLO on my part, so if you are looking to do this yourself, definitely look into the BMS options available these days. It’s probably improved quite a bit. (2024 update: no idea how reliable they are, but you can buy pre-built LiFePO packs bigger than mine from Amazon with BMSes built in. :O)
Power Output (120V Inverter vs 12V DC)
At the start of this project I was vaguely aware that household power ran at 120V AC and cars at 12V DC. At home you plugged things into a pronged outlet and in a car you could plug things into a cigarette lighter. I would need to find a way to bridge these two worlds.
I figured out pretty quickly that I needed an “inverter,” which would transform the automotive standard 12V DC input into a household standard 120V AC one. There are cheap auto inverters that plug into a car’s cigarette lighter, but they tended to be rather shoddy and flimsy. Most critically, I couldn’t find ones that went higher than ~150W. This curious phenomenon turned out to be due to the average car’s dashboard wiring only being able to support a given amount of current - the wire gauge is understandably sized for typical car use cases, which are not especially demanding. I looked up the energy requirements of things like my flatiron and rice cooker and found these were beyond its humble means. Mightier inverters easily capable of powering a rice cooker and beyond did exist, but these ones didn’t connect to a cigarette lighter - you had to connect these directly to a battery bank with suitably beefy cables and lugs. That was fine by me because I had intended to connect the inverter to my LiFePO pack in the first place.
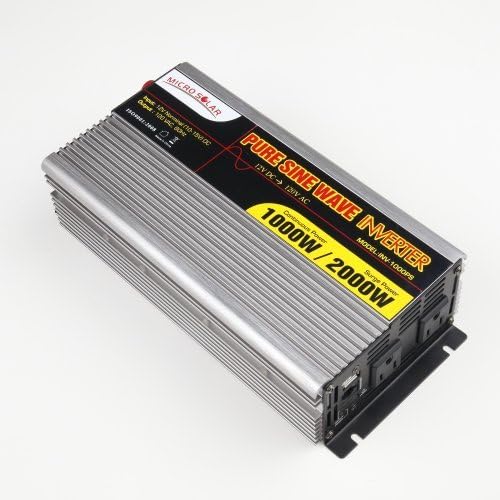
Inverters typically have a constant rating and a surge rating. A lot of electrical appliances spike hard (“surge”) on startup but immediately drop to a lower and steadier (“constant”) state. Energy-guzzlers like a microwave or a hyper-efficient Dometic fridge were out of the question given my limited rooftop solar area and financial constraints limiting my battery storage size. What I really wanted was easy and fast hot water. Thus, I sized my inverter at 1KW to be compatible with my beloved Ovente electric kettle.

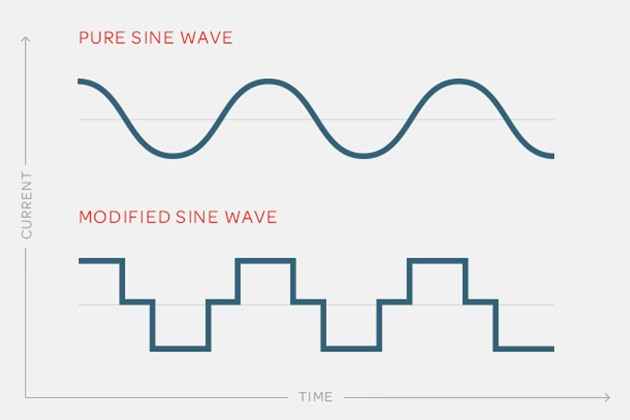
Another thing to be wary of was the quality of the AC voltage put out by the inverter. This is supposed to be a nice sine wave, but cheapo inverters (aka “modified sine wave” inverters) emit these very choppy step functions that could (it was said) harm or annoy your electronics, making things run hotter and less efficiently. The better quality inverters identified as “pure sine wave” inverters to reflect their higher fidelity waveform. They also didn’t make obnoxious buzzing noises as the modified sine wave ones reportedly did. Pure sine wave inverters are, however, much more expensive. Victrons were very popular, but even their 1KW inverter was pretty costly for me at the time. I scoured the Amazons until I found an only somewhat sketchy MicroSolar pure sine wave inverter which was roughly half the price of the equivalent Victron offering. This was already nearly scraping the bottom of the pure sine wave inverter market but it ended up working out well enough for me. While featuring essentially no customizability, it did come with a built in “emit an ear-piercing screech and shut off” failsafe for when the voltage became too high or too low for its tastes. This would help prevent my mystery meat inverter from atavistically running amok and destroying the battery pack or itself.
Some energy is used up in the voltage transformation process and the inverter consumes energy by default as long as it’s turned on (I think mine was 0.5A or so). For vandwelling purposes, it is best to use 12V where possible - especially for power you want available on demand 24/7 - and only use the 120V for things that need it. I ran the battery to a 12V fusebox from which I could direct 12V DC current to wherever it was needed elsewhere.
Telemetry
- bayite 6.5-100V 0-100A DC LCD Digital Current/Voltage/Power Display w/100A Current Shunt ($18)
- Bud Industries CU-3285 Black Plastic Utility Box 8.25”Lx5.15”Wx3.12”H ($20)
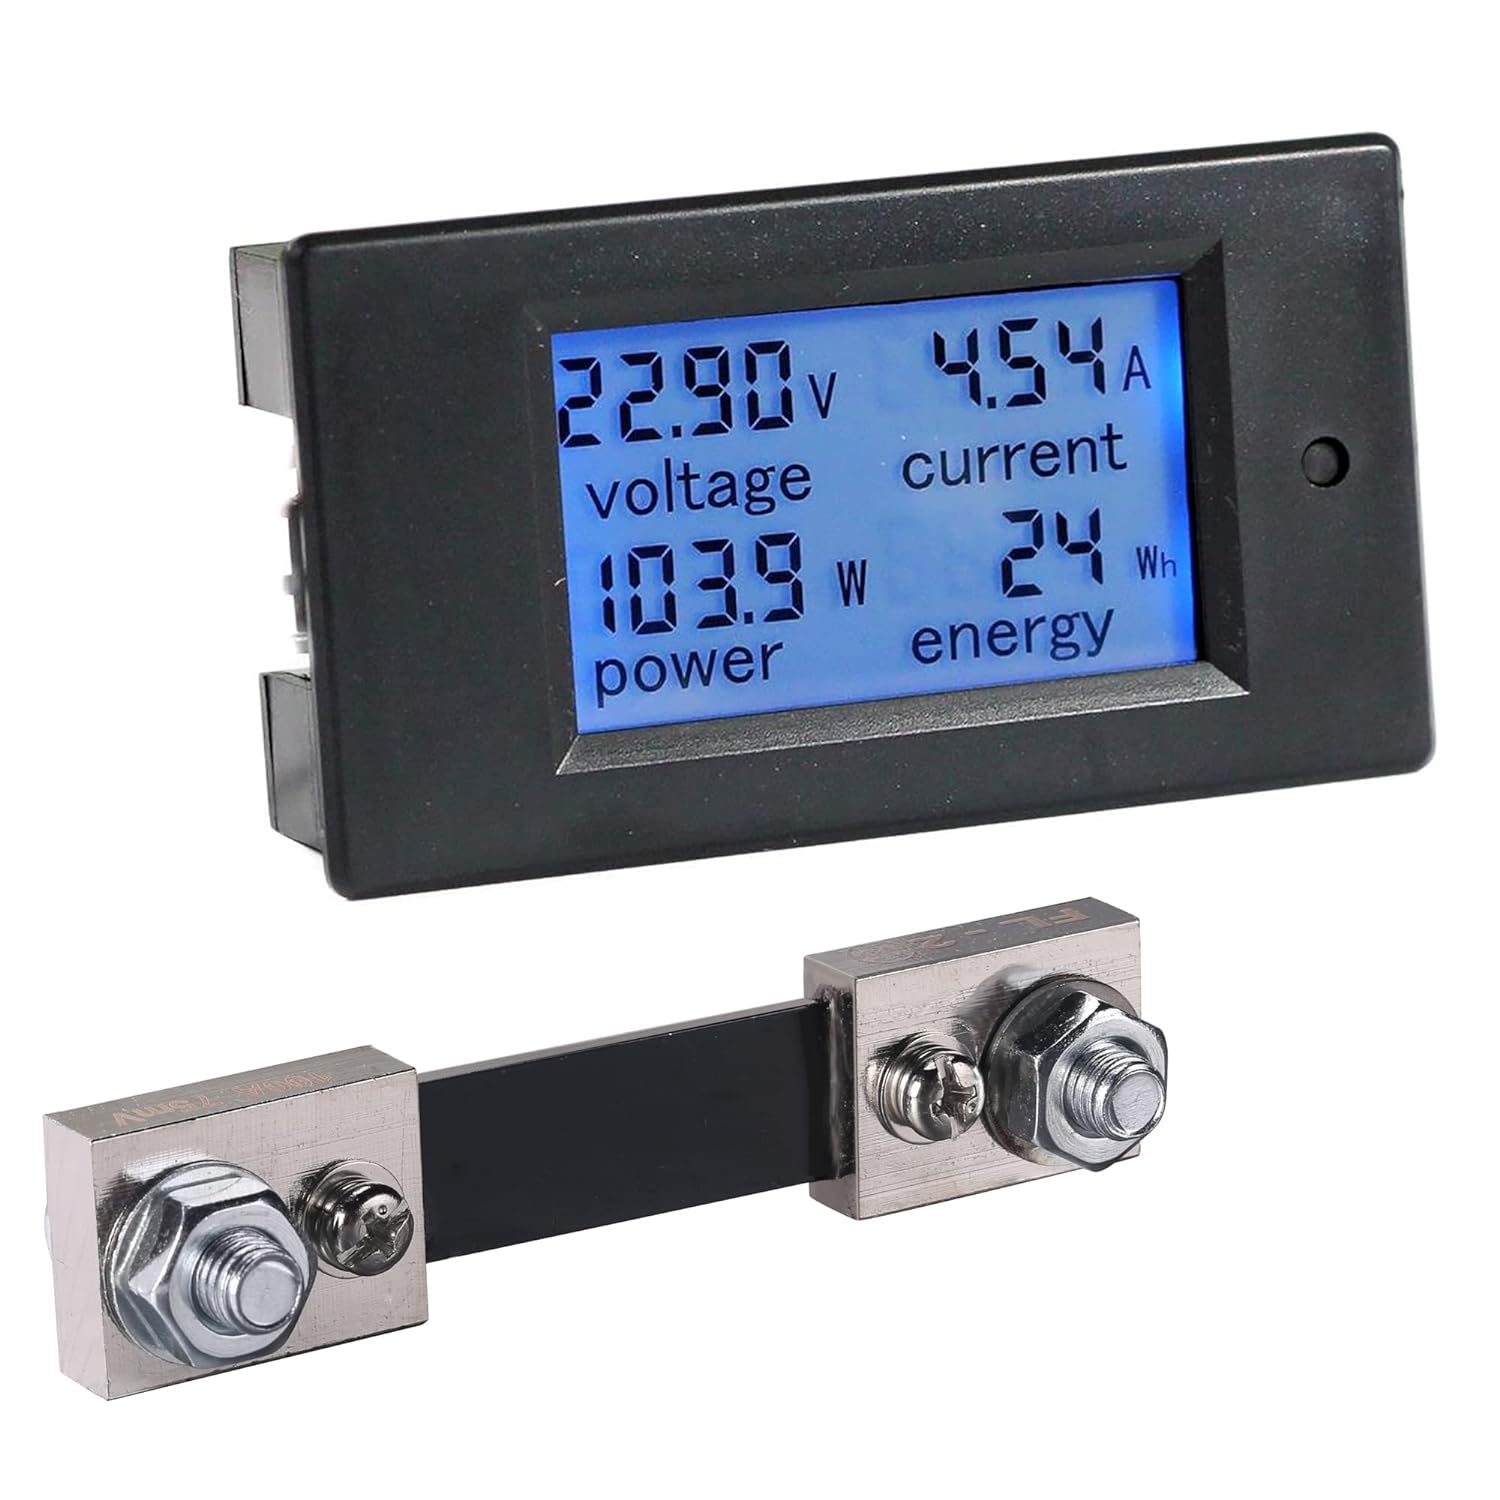
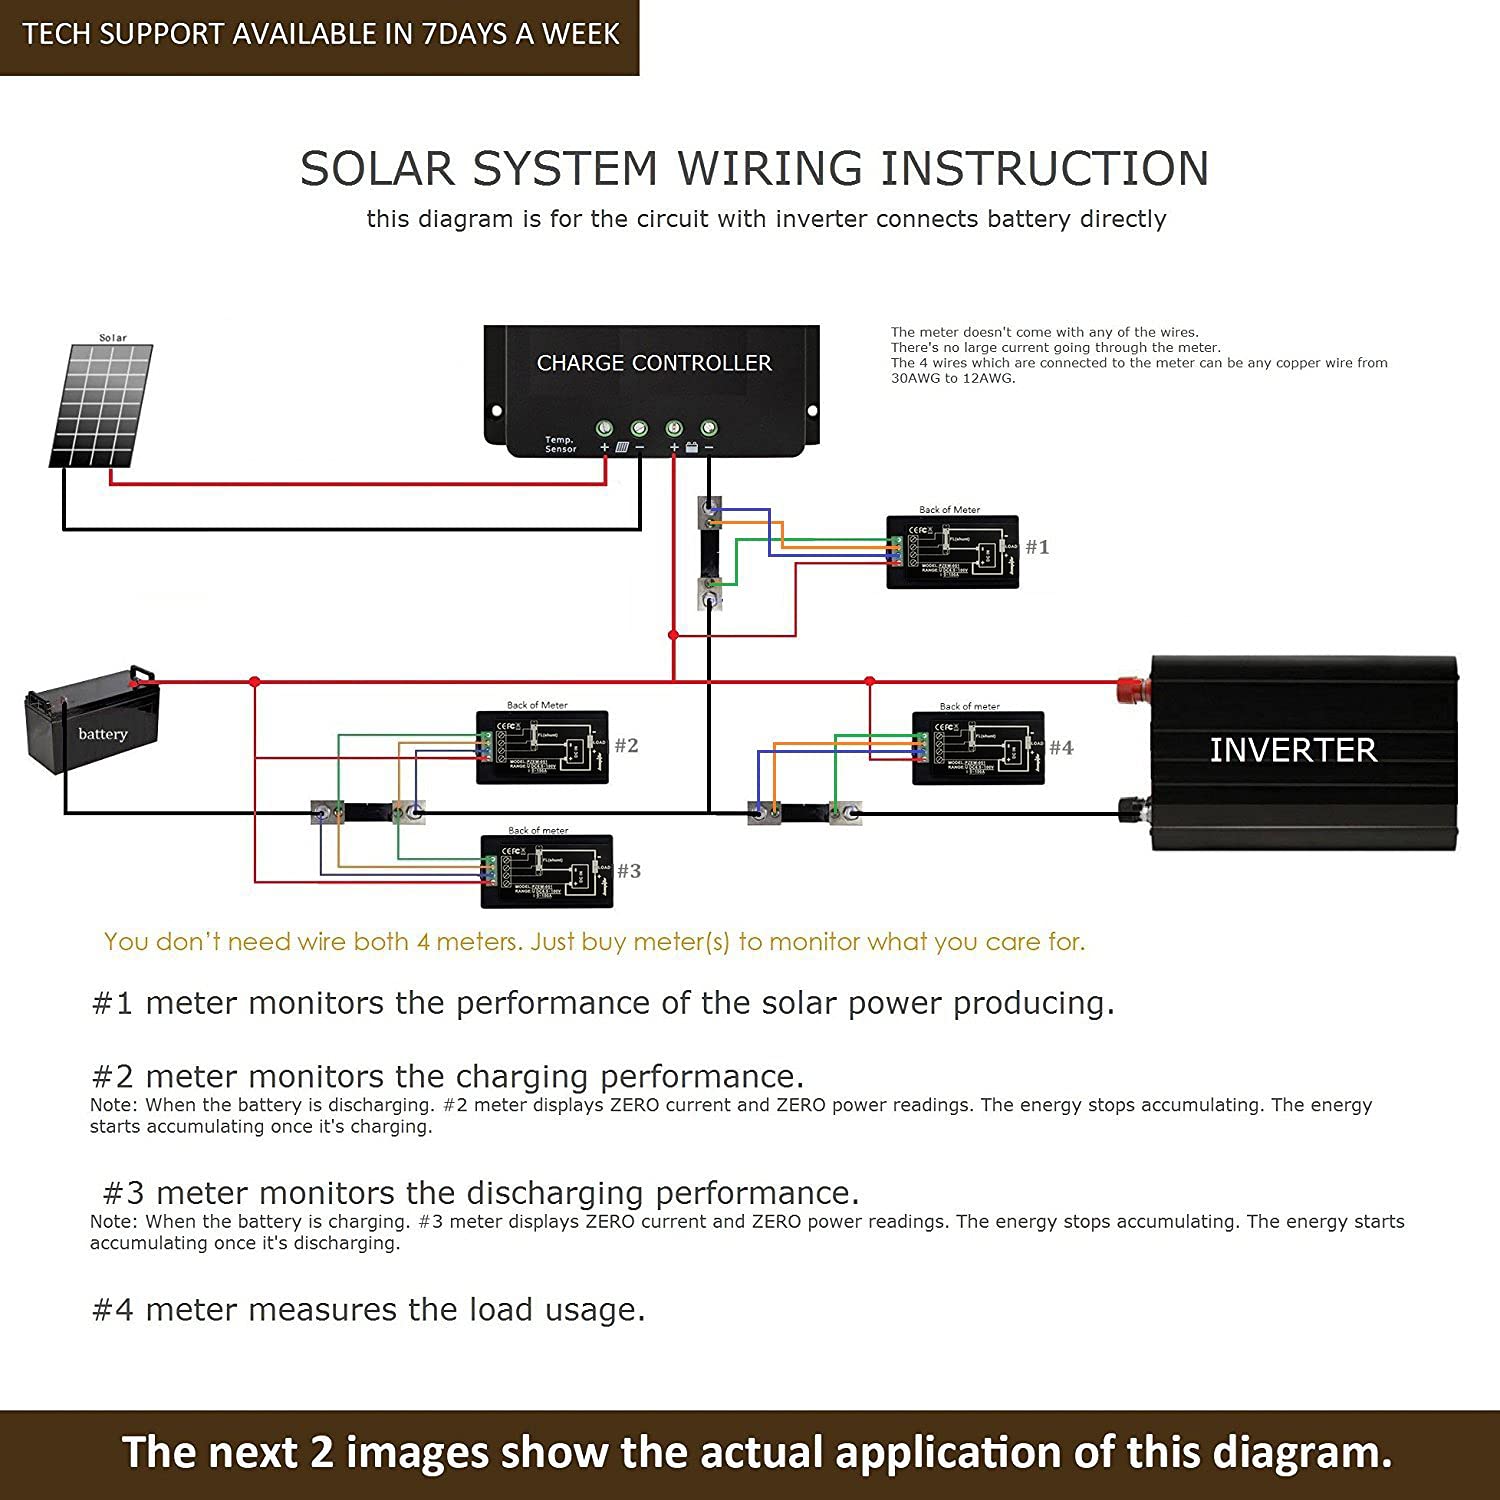
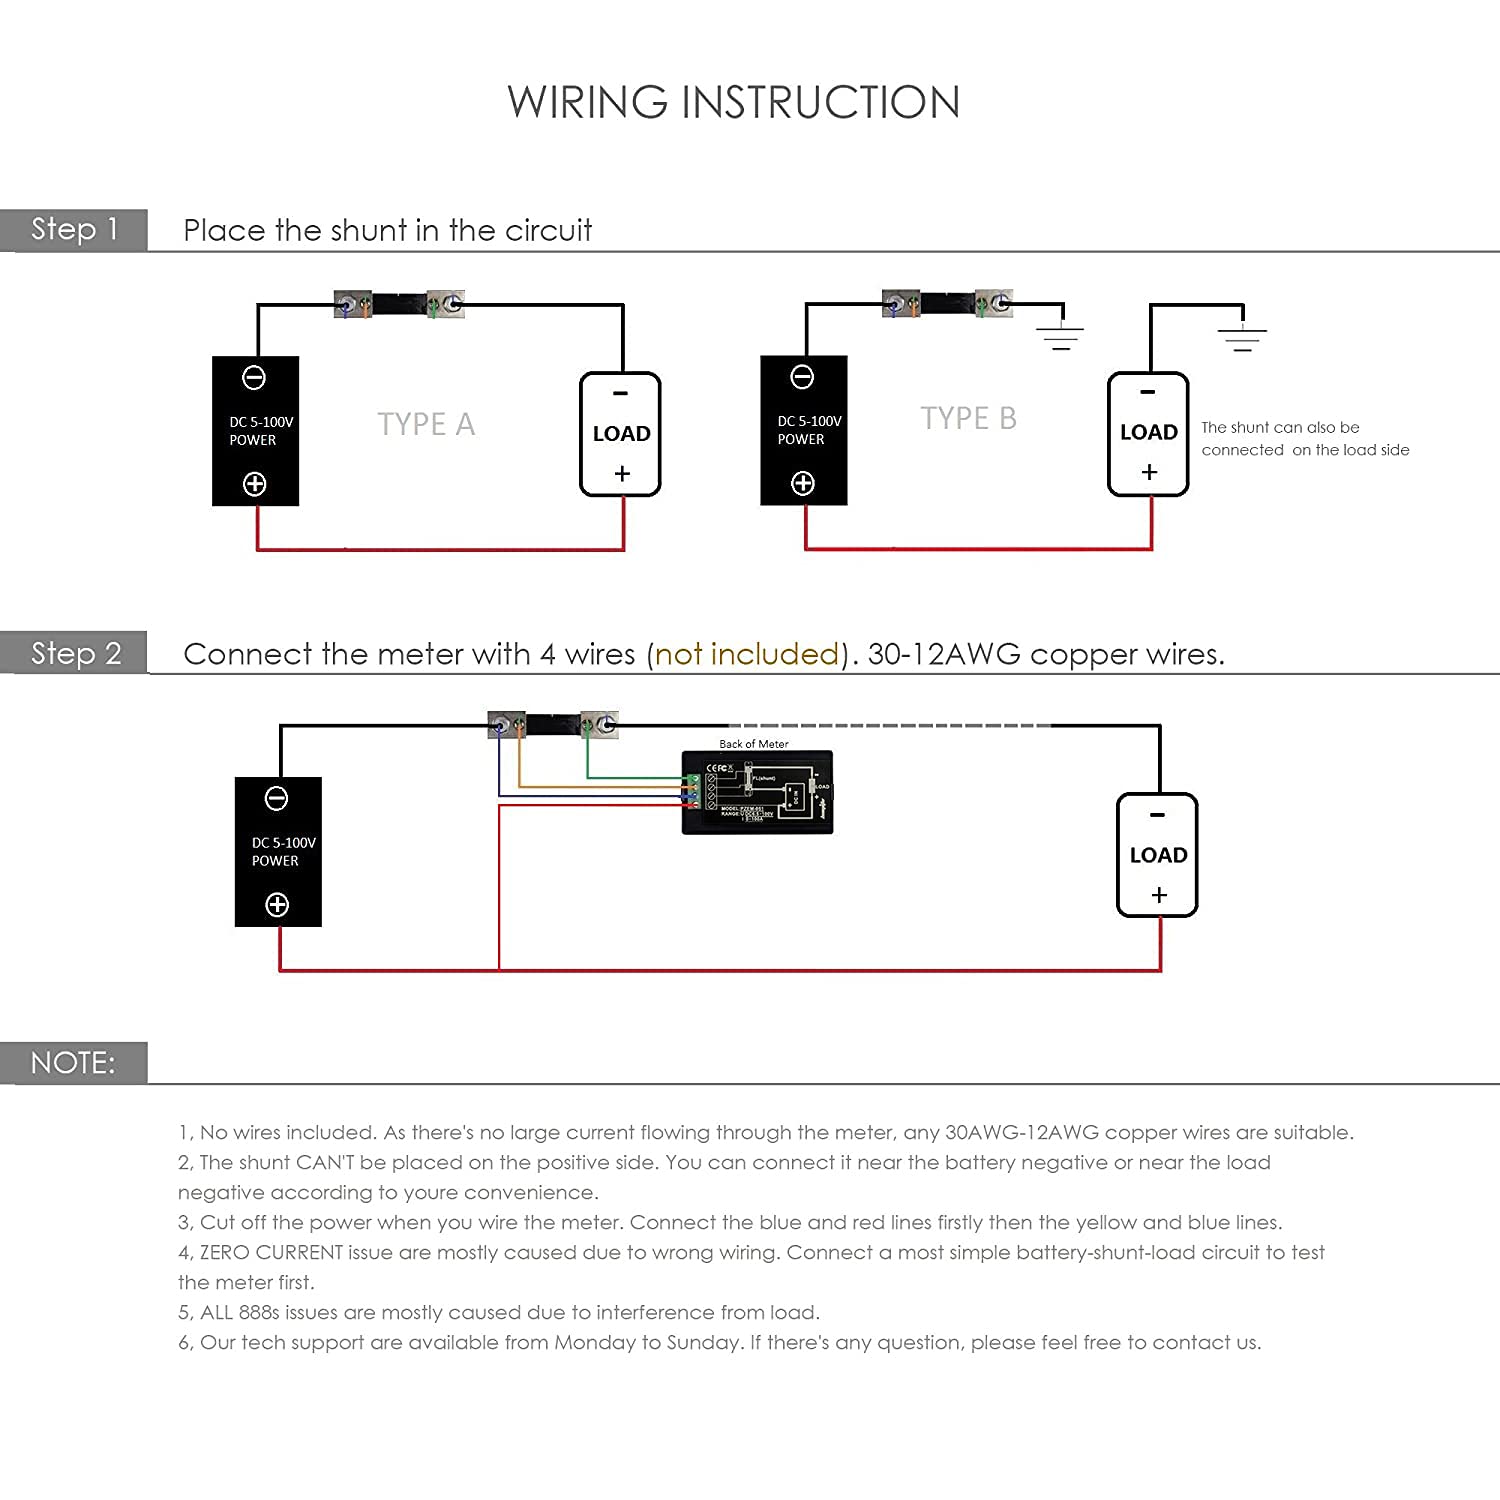
I needed some way to get an idea of my current power situation at a glance. There are a bunch of cheap display panels that will let you monitor your voltage (V), current (A), watts (W), and total power usage (WHr/KWHr). Most also offer a low voltage alarm. This was helpful for me since my 12V DC output had no automatic disconnect.
To measure current, I would need a piece of metal called a “shunt resistor” on my return path big enough for all the current to pass through. The resistance (R) of the shunt is listed in the documentation, and voltage sensing wires are attached on each end of the shunt to measure the voltage drop (V) across the resistor. Now, V = IR can be deployed: the V and R are known, so your panel can calculate the I and display the current amps. The watt-hour measuring functionality was great; I still remember watching the W tick over to KWH for the first time. Since my system was very small, I would only use about ~140KWH over the course of my time in the van.
For the housing, I got a plastic “utility box” and drilled holes in it for the led display, some “SPST” (“Single Pole, Single Throw”) toggle switches, and a 12V cigarette lighter style output for usb charging.
Alternator
I wanted to be able to charge my LiFePO pack off my alternator in a pinch. This part held the most uncertainty for me because I could find very little concrete information about it in 2015.
As mentioned above, lead acid batteries are meant to dip briefly and recharge immediately. Alternators are also designed with this use case in mind. Lithium chemistries can absorb huge amounts of current, much more than the lead acid that alternators are designed to accomodate. You can murder your alternator by working it to death and cooking it alive in its own heat if you aren’t careful. With this in mind, I upgraded to a larger (105A) alternator to add some overhead and also added a battery isolator so that the alternator would remain disconnected by default. 2/0 cable ran through the front firewall to the back of the van, and I added relay control cables that connected to a button in the dash. Alternators work much more effectively when driving on the highway than at idle…I did this probably more than I should (it’s not good for your engine either :(), but it was only ever in cold weather (making alternator overheating less likely). I waited a bit for the system to recover from the initial startup and toggled it on and off to give it a break every now and then.
There are better methods available these days (DC-DC limiters, temperature monitoring/regulating devices mounted on the alternator, etc) but I was cautious with mine and never had any problems. Keep in mind that if you’re planning to run things overnight (as opposed to 20 minutes max once or twice a week in the winter when you’ve had a week of cloudy weather with poor solar yields) or if you have a 600AH bank vs a 60AH bank, your use case will likely require an entirely different approach.
Solar Panel Charge Controller
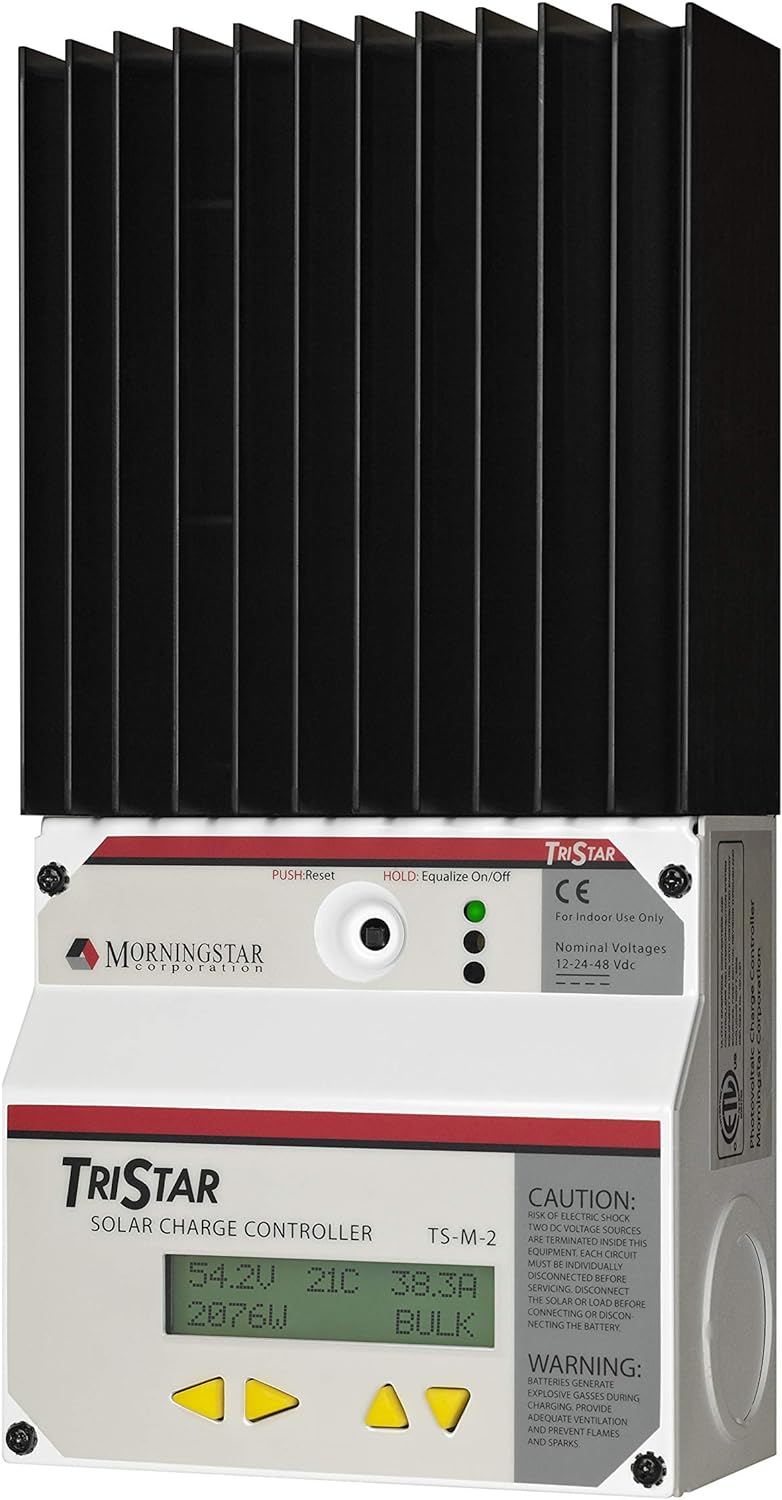
- Morningstar Tristar 45A PWM Solar Panel Charge Controller 12V/24V/48V Batteries ($170) + Tera Grand USB 2.0 to Serial RS-232 DB-9 Converter ($12)
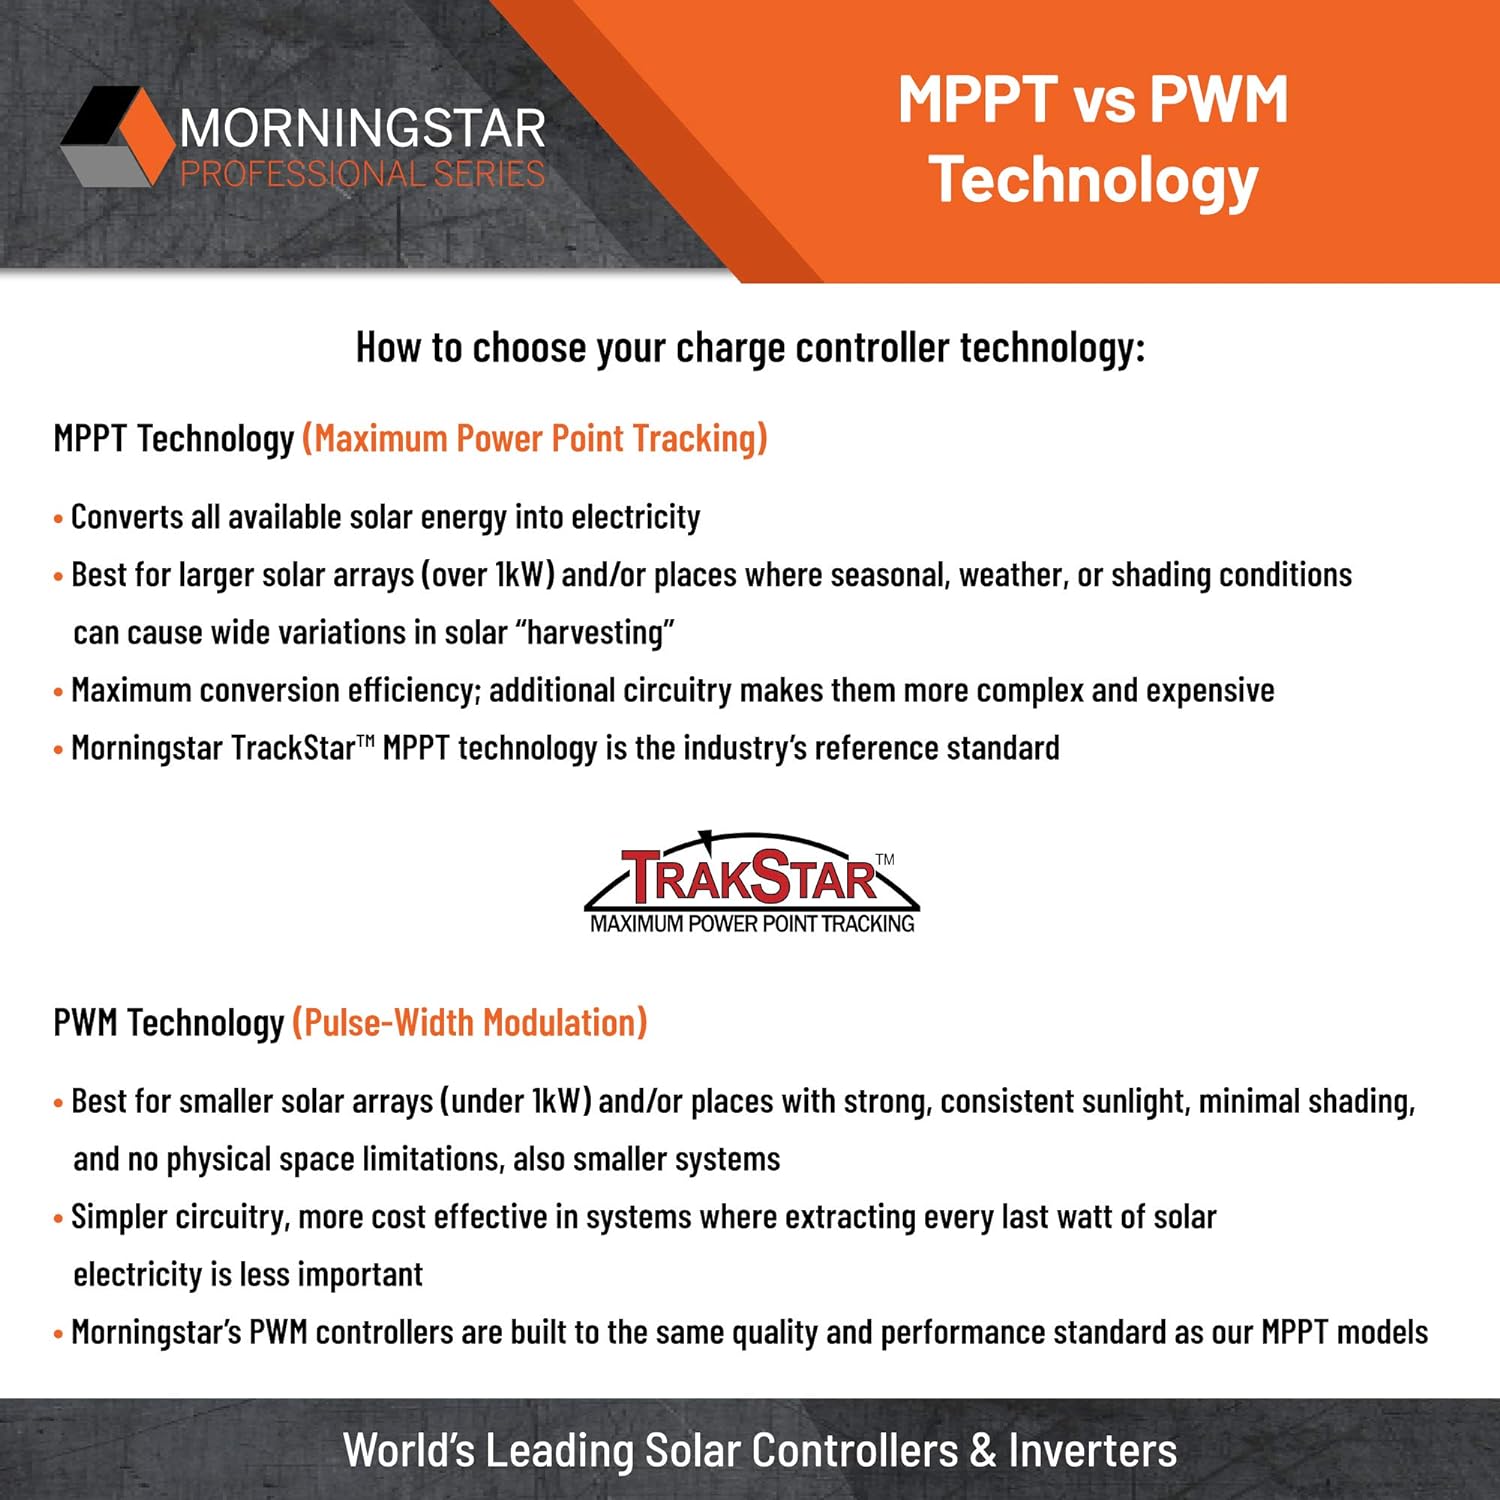
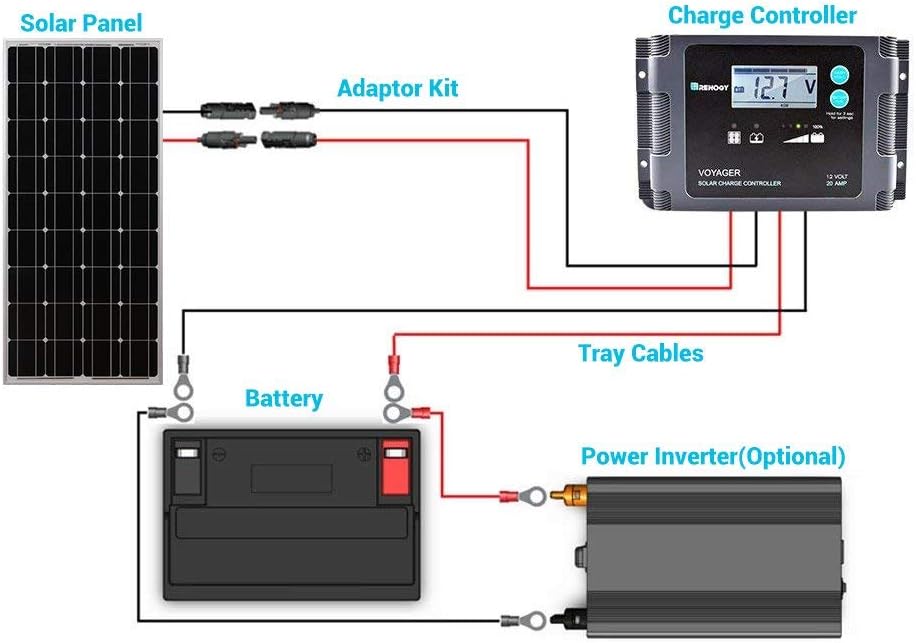
I couldn’t just connect my solar panels straight to my battery pack. I would need a solar charge controller to regulate the power coming in down to a suitable level and disconnect the panels when the batteries were at full charge. Solar charge controllers come in two types: Pulse Width Modulation (PWM) and Maximum PowerPoint Tracking (MPPT).
MPPT is:
- More efficient at cooler temperatures.
- Can convert surplus voltage into extra charging current.
- In a PWM system, this extra energy would instead be lost.
- Much more expensive.
- A lot of cheap charge controllers that claim to have it actually don’t.
PWM is:
- Cheaper.
- Much less complex, with fewer things that can go wrong.
- A sketchy PWM module is much less likely to do something retarded than a sketchy MPPT device.
- Requires your panel voltage to match your battery voltage.
For large solar installations, wiring panels in series is a great way to get a higher voltage (higher voltage = smaller cables = less voltage drop and/or money spent on high gauge copper wire). I only had two panels, so wiring in parallel wasn’t a great hardship; I decided I didn’t really need MPPT.
Finding a LiFePO4 compatible charge controller in 2015 proved challenging. Virtually every solar charge controller on the market was pre-programmed with a charging algorithm designed for some flavor of lead acid batteries. Those might enjoy a desulfating, but your LiFePOs…not so much. I was quickly deluged by cheap Chinese charge controllers that claimed to be programmable but had practically negative documentation, so I’d sift through dozens of amazon reviews just to inevitably find the one guy complaining that “programmable” meant you could choose between presets for Lead Acid (LA), Sealed Lead Acid (SLA), and Absorbent Gel Mat (AGM).
I would either need a LiFePO specific charger or an actually programmable charge controller (if just to turn all these annoying and unwanted lead acid battery “features” off). Sadly, LiFePO specific offerings were practically non-existent:
-
Genasun was the only company I could find that specialized in solar charge controllers specifically for use with LiFePO4 chemistry. However, my solar panels could be configured in either 6A @ 24V or 12A @ 12V, and at the time I was doing my build, Genasun didn’t offer a charge controller suitable for use with either option. They also required you to send them in to Genasun to have their programming reconfigured.
-
Biennopower also offered some, but I couldn’t find many reviews or details, so opted to skip them.
There were scant few other options on the web, most of which were either sketchy, mysteriously vague, and/or (for me) very, very pricey ($300-600).
I had much better luck looking for a “general purpose” charge controller not specific to any chemistry. These are more expensive than ones with 2-3 preset options, but since they’re (actually) programmable, you can change the parameters to something that will keep your LiFePO4s happy.
The most affordable option proved to be the Morningstar Tristar. It’s a PWM solar charge controller with EXCELLENT documentation. You can make it do whatever you want, and it will also log charge data for you. (Mmm…data…)
The are two steps to setting up the Morningstar Tristar. The first is to configure the DIP switches, which are insanely small. I used this to set the charge profile to “custom.” The second step is to actually design the custom charging profile. This is accomplished with a computer and a TS-232 to USB connector cable. Morningstar offers a free program called MSView which you can use to tweak everything just to your liking. It’s a very basic GUI interface—it looks like something straight out of the 90s. But it gets the job done. The one time I had a question about their software, I emailed the company and got back a response nearly immediately from a US based engineer who was completely competent and literate. A+ support. My only complaint is that I wish it could retain more days of charging history. Unfortunately I forgot to save my settings and I don’t remember what I used exactly, but it’s important to check the documentation for your specific brand of battery cells because their preferred setpoints do actually vary somewhat between brands (and the LiFePO “knee curve” is pretty sharp).
Connections
On paper, you can just circuits as lines on paper. In reality, I was not immediately sure how to join multiple wires together in a robust fashion. After some freeform search terming, I started to see things I wanted that identified themselves using words like “fuse block,” “common busbar,” “grounding busbar,” “power junction post block,” or “terminal block.” For junctions where I wanted all the wires to tie to a single source, these stand alone “common busbars” worked super well. One additional consideration was that each of these had a maximum amp rating it could handle (most were completely sufficient, my system being small) and also came in a variety of lug sizes for the posts (this caused a lot more head scratching, since I often had tiny and mighty wires coming to meet at the same bar). I used a 12V “fuse block” for splitting my 12V output into multiple 12V outputs in a sane and controlled manner (such that each line got its own dedicated terminal mount and its own fuse). This was used to power my two sources of internal light: a small 12V overhead light bulb and a brighter length of 12V LED strip that would go along the top side boards to light up the entire inside (for eg spider hunting). I ran the 12V connections for these down to a black plastic junction box attached underneath the plastic shelf so that I could switch the lighting and have a 12V cig lighter outlet within easy reach. I plugged a 12V-5V usb converter outlet/splitter to this from which I could easily charge my phone and tablet while cozied up in bed.
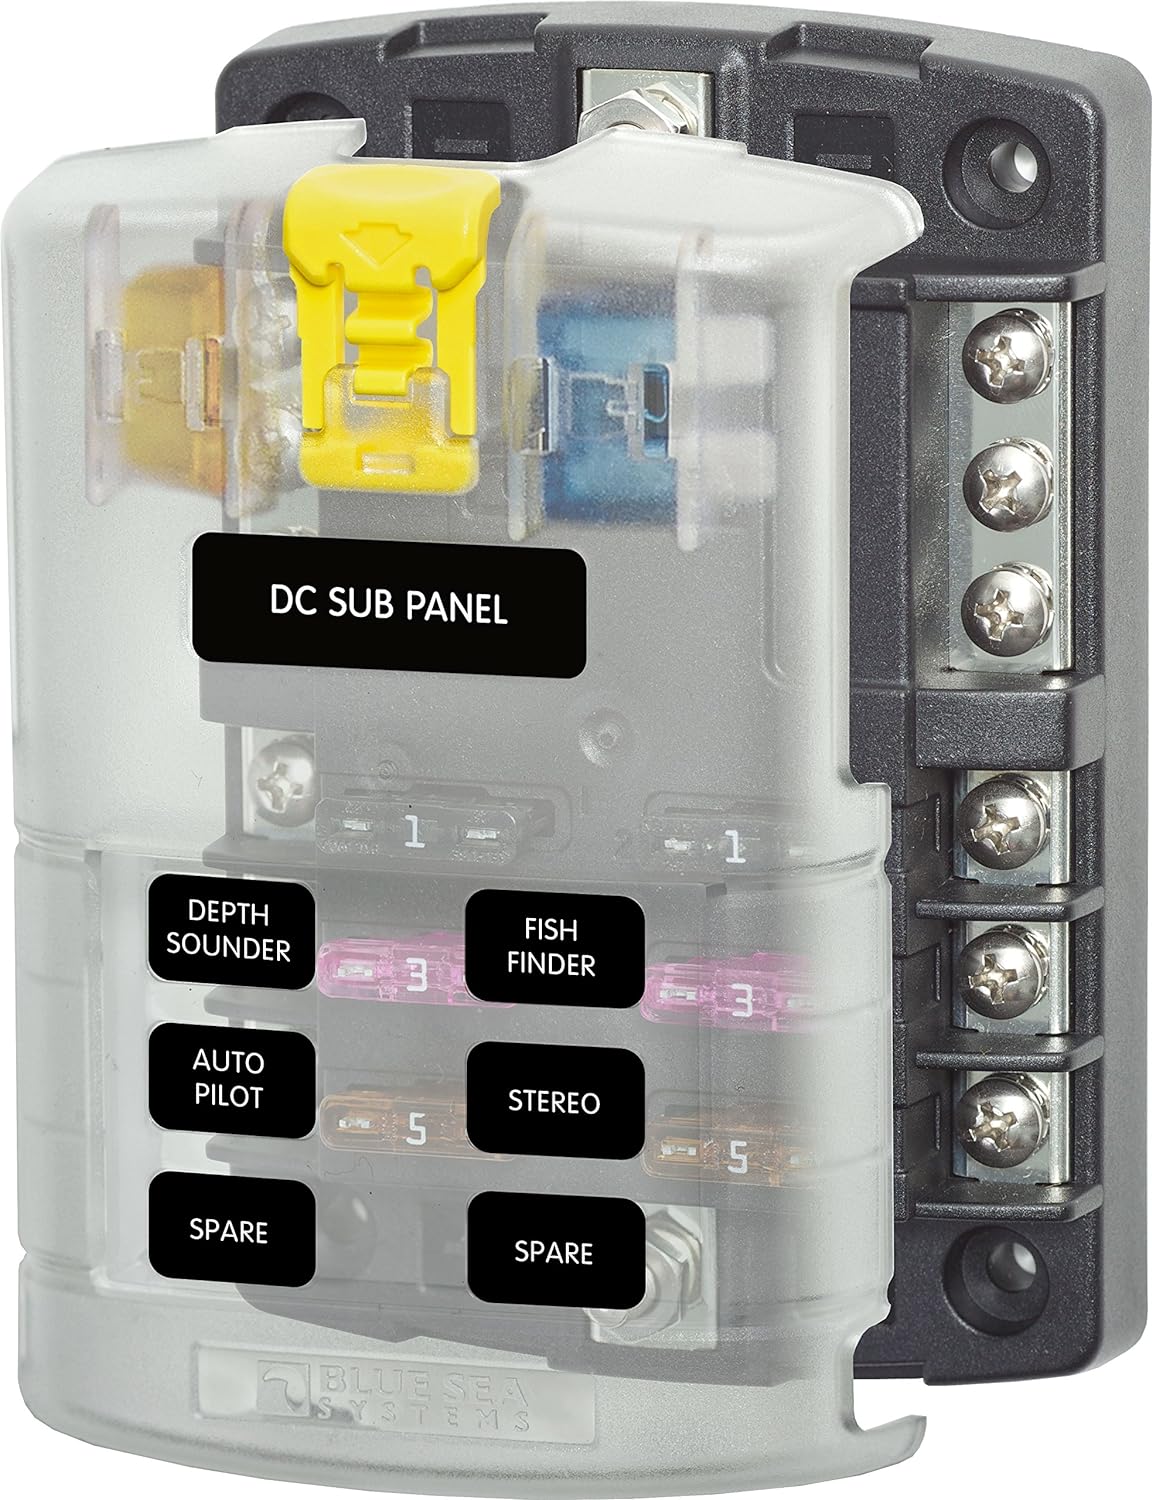
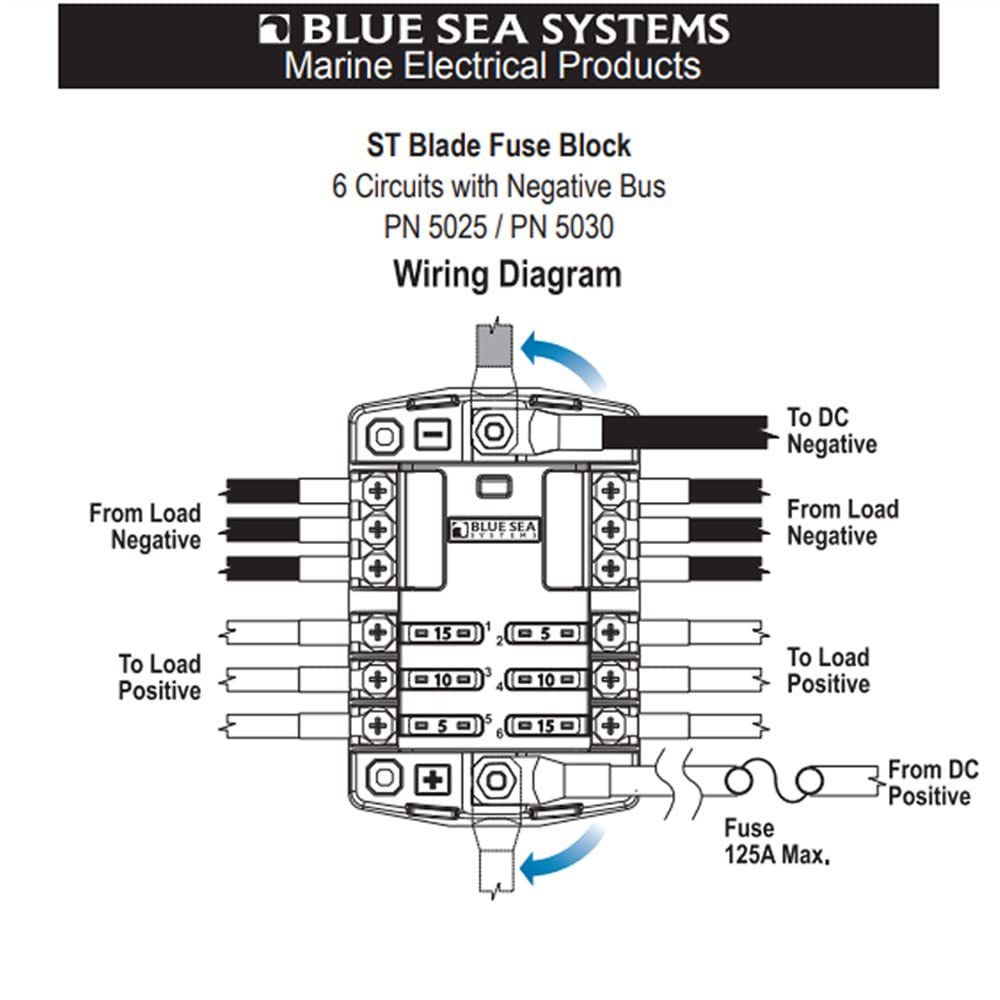
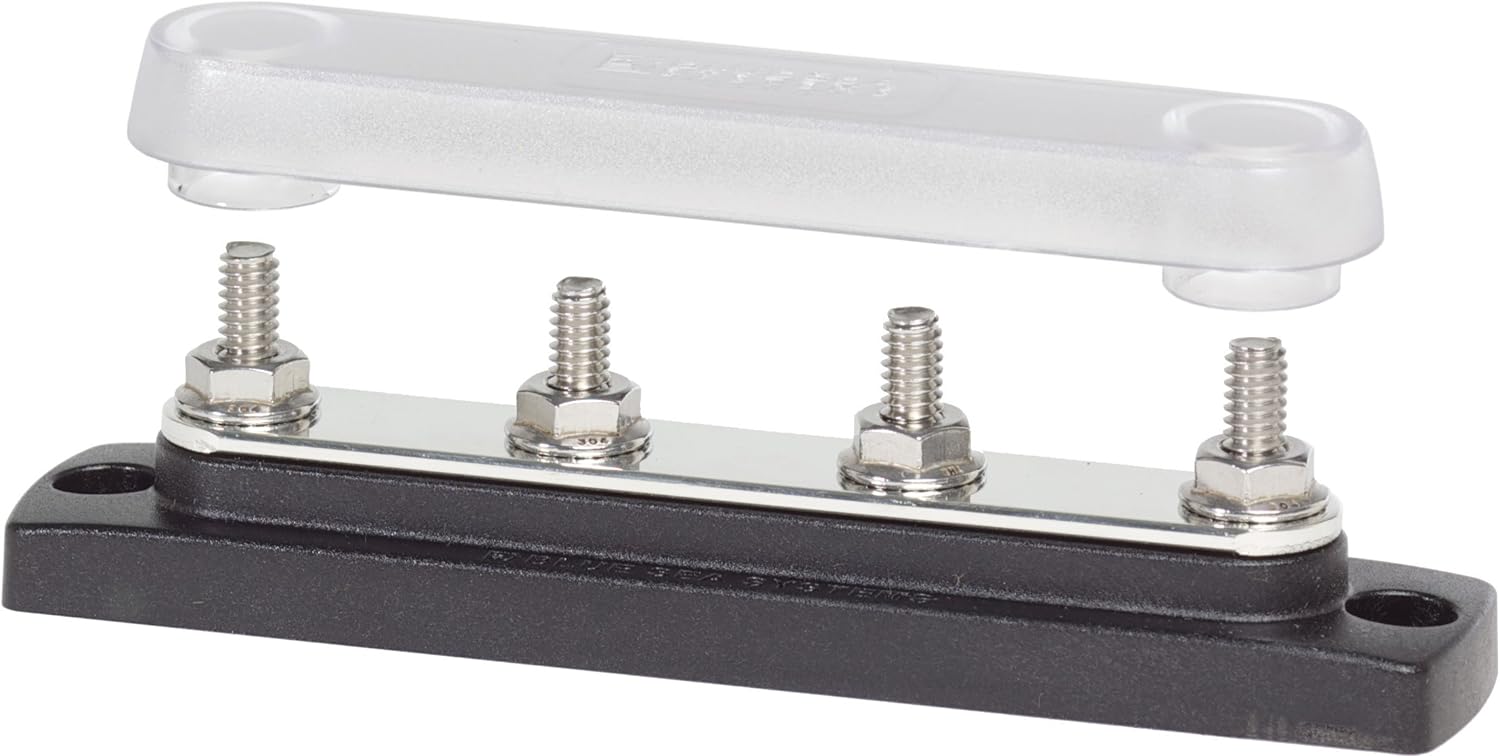
I used a lot of busbars and fuse blocks from Blue Sea systems which was a marine hardware brand that basically oozed quality. Many things useful for van-builds are often found in the marine category since boats have similar use cases. (One popular how-to site was “pbase,” later rebranded to marinehowto.com, and had many interesting articles.)
Wire
For high gauge wire, you can visit a hardware store or even an auto store. For low gauge wire, something like welding cable might work better than the THHN you’ll find at Home Depot. I had to look at a lot of charts since I wasn’t sure what awg was suited for anything. Keep in mind that this is a bit of a moving target. The length of the wire matters a great deal as well.
I found sites like this helpful for getting an idea of what gauge of wire to look for for a given wire length: http://circuitwizard.bluesea.com/
Fuses
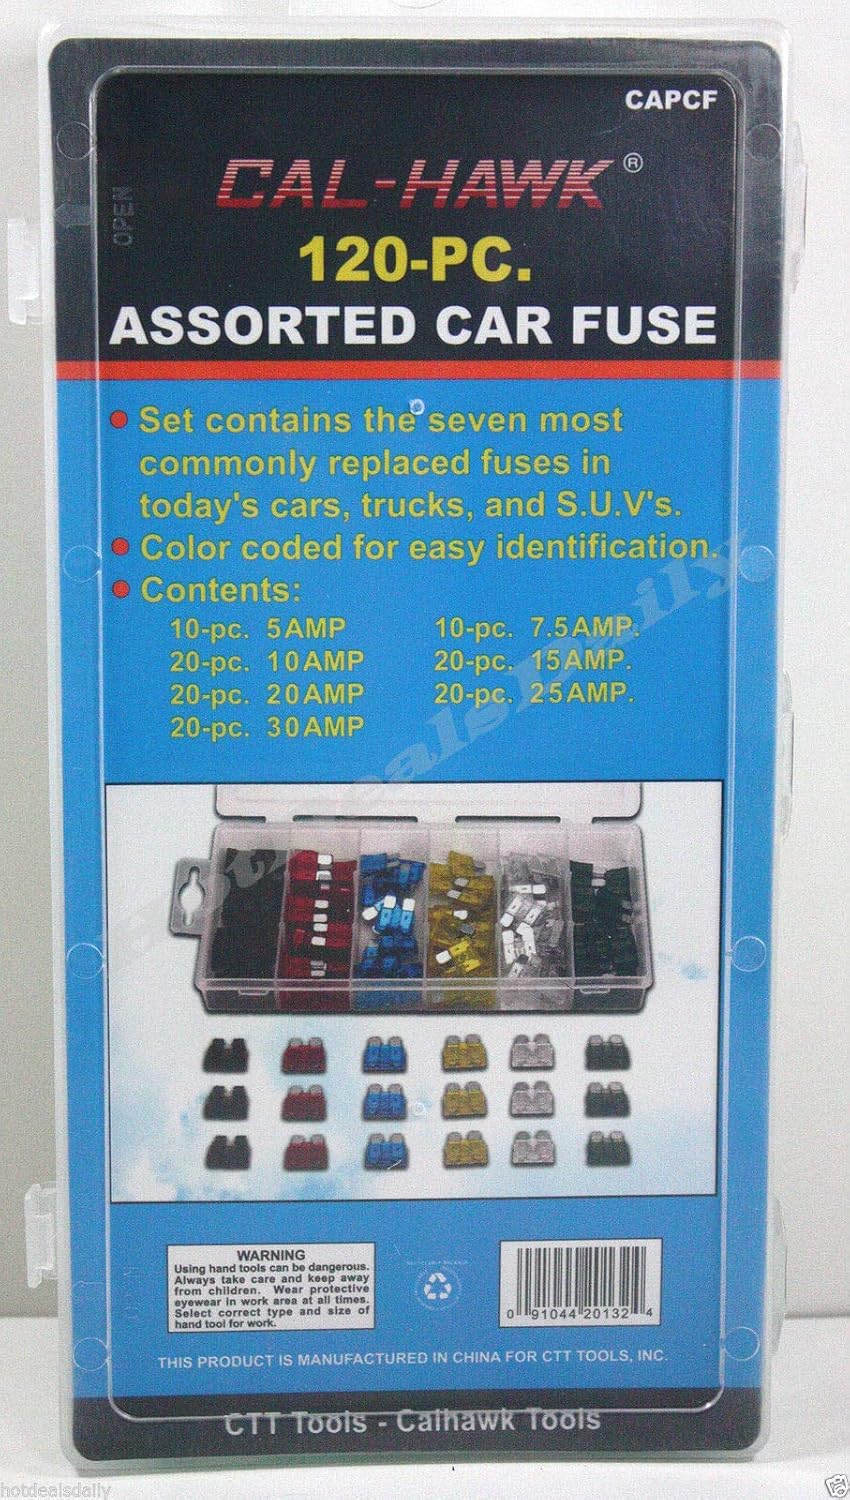
These were very important since I was a novice who only had so much of an idea what I was doing. Much like with wires, there’s a range of form factors for fuses depending on how srs business of a load they will be expected to carry. Most car wiring uses “blade fuses,” which have two prongs that slot right into a fuse box. The heavier ones (“ANL”) required a screw mount and lugs. Within each form factor, you can find a range of amp ratings. A critical point here is that you want the fuse to be the weak link in the system and asplode before anything more important does. The fuse is not just to protect your devices, it’s to protect your wire, too, so the closer you can do it to the beginning of the wire run, the better. Of course, sometimes this is just not practical (I fused my solar on the inside of the van).
From least mighty to most mighty:
- “ATO/ATC” fuses (regular car fuses)
- “Maxi” fuses (larger and higher capacity than default car fuses)
- “ANL” fuses (often seen for subwoofer type audio upgrades in cars)
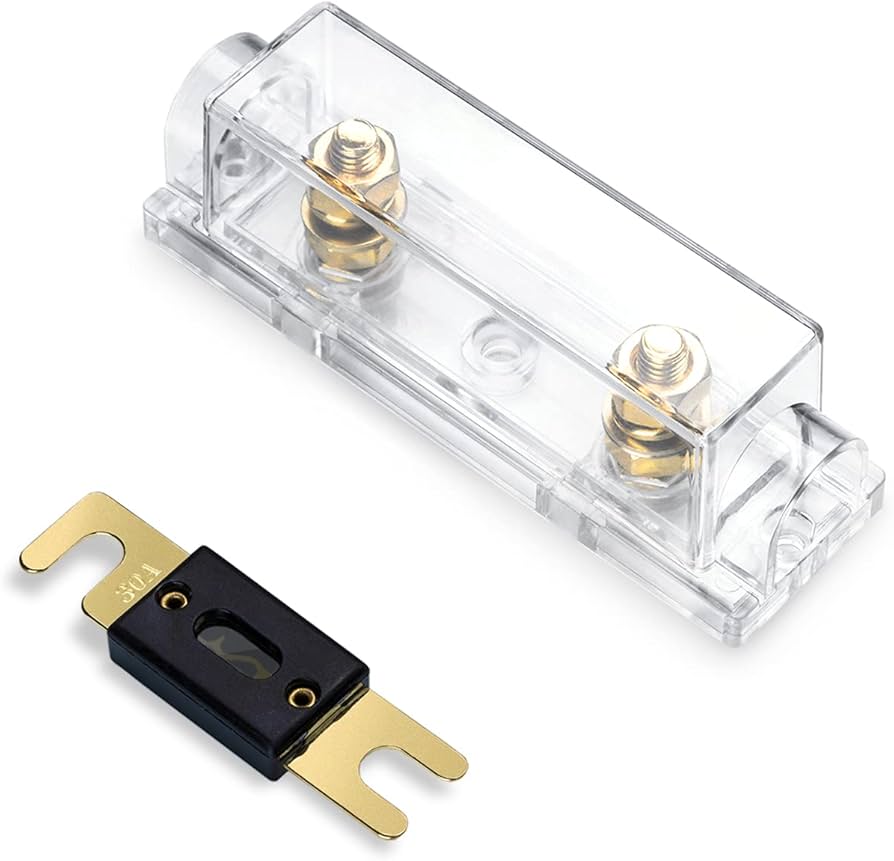
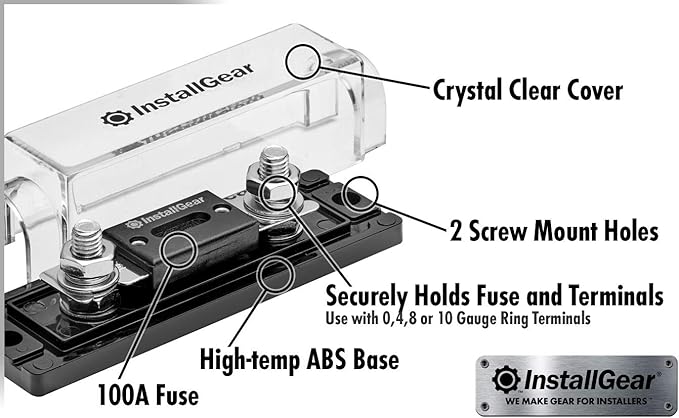
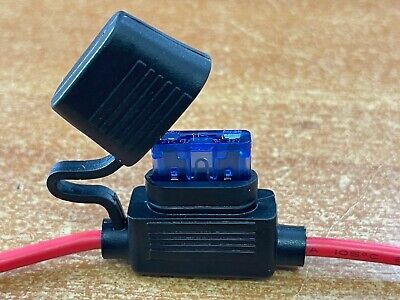
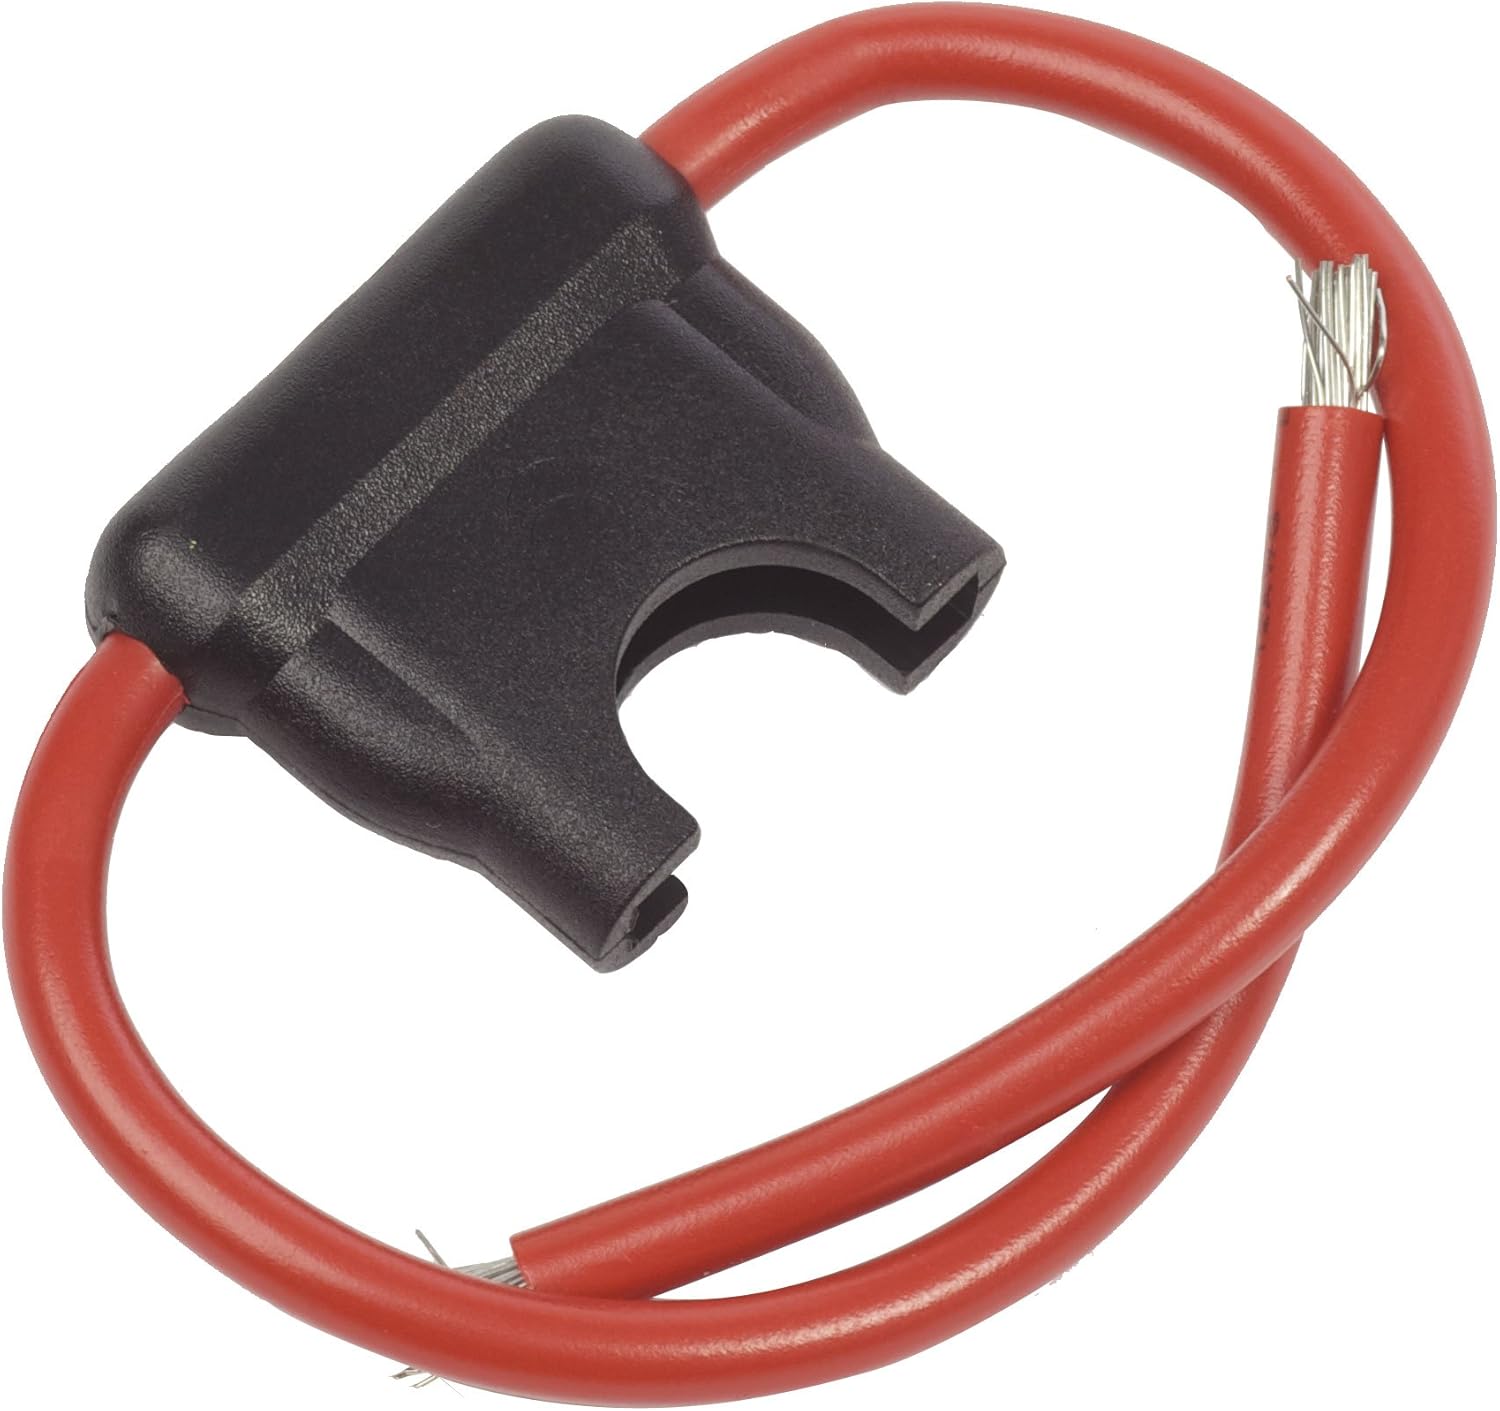
Rob used an ANL fuse for the 2/0 cable run in the engine bay, and I used one for the main power line between my battery and load on the power shelf. I used “inline” maxi fuses for the solar inputs and “ATO/ATC” fuses for the 12V outputs (led striplights, overhead lamp, etc).
The only time one popped while working on the van was when we mounted the runner boards and accidentally nailed the 2/0 cable in the gutter with the screw. That made quite a noise!! We pulled the wire and wrapped the puncture wound in electrical tape before I replaced the fuse in the engine bay. After that, I don’t think I ever blew a fuse the entire time I lived in the van.
Extended Supply List (In Case This Is Useful To Anyone)
Power shelf:
- MicroSolar 12V 1000W (Peak 2000W) Pure Sine Wave Inverter ($170)
- Morningstar Tristar 45A PWM Solar Panel Charge Controller 12V/24V/48V Batteries ($170) + Tera Grand USB 2.0 to Serial RS-232 DB-9 Converter ($12)
- PAC PAC-200 200-Amp Relay Battery Isolator ($40)
- EWCS 6 Gauge Flexible Welding Cable 600 Volt (15 Feet Each of Black/Red) ($30)
- bayite 6.5-100V 0-100A DC LCD Digital Current/Voltage/Power Display w/100A Current Shunt ($18)
- Marinco 701 Battery Disconnect Switch ($16)
- DB Link 0/2/4 Gauge Ga ANL Fuse Holder + 150 Amp ANL Fuses (2 Pack) ($14)
- Blue Sea Systems 5064 In-Line ATO/ATC Fuse Holder (2 x $3.50)
- Blue Sea Systems 5025 ST Blade Fuse Block 6 Circuit with Ground and Cover ($30)
- Blue Sea Systems 2307 150 Amp Common BusBar with 4 studs and a cover, With Cover, 150A ($20)
- Blue Sea Systems 2315 100 Amp Mini BusBar with 4 studs and a cover ($15)
- Ovente KG83B Black Glass Electric Kettle 1.5L ($30)
Tools:
- TMS Crimper-WL-YQK-300 16 Ton Hydraulic Lug Terminal Crimping Tool ($42.50)
- Jonard JIC-63050 High Leverage Cable Cutter with Red Handle ($16.50)
Neiko 01924A Ultimate Self-Adjusting Wire and Cable Stripper ($16)(production moved from Taiwan to China, only destroys wires instead of stripping them now)- IRWIN VISE-GRIP Wire Stripper, Self-Adjusting, 8-Inch #2078300 ($26) (color is bad, but at least it works! seems to be the old neiko design)
- Hakko-CHP-170 Micro Cutter - Red ($4.50)
Interior (electric):
- Bonlux Screw Base 12v LED Light Bulb Lamp (5w Warm White) ($9.49)
- LE 16.4ft LED Strip Light 300 LEDs SMD 5050 Non-Waterproof 12V Warm White ($13)
- HOTSYSTEM™ 12 Volt 30 Amp LED SPST ON-OFF Rocker Switch Toggle 5-pack (2 x $10)
- HOTSYSTEM™ 12V 16 Amp LED SPST ON-Off Round Toggle Switch ($8)
- Bud Industries CU-3285 Black Plastic Utility Box 8.25”Lx5.15”Wx3.12”H ($20)
- Marine Grade Cigarette Lighter Socket 12 VDC ($5.50)
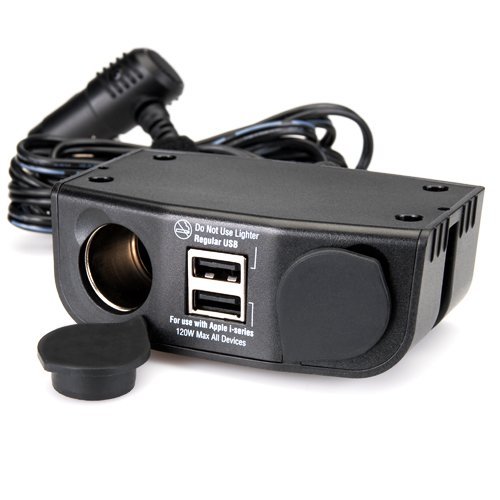
- Vehicle Charger with Dual USB Ports and Dual 12 Volt Sockets - Magnadyne ($22)